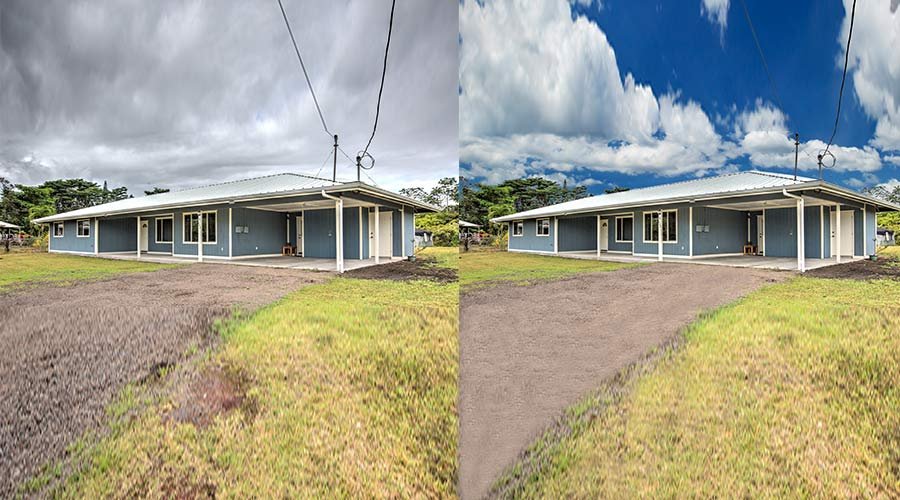
Capturing high-quality real estate photos is just the first step in showcasing a property. Effective editing techniques can significantly enhance your images, making them more appealing to potential buyers. Here are some essential editing techniques to take your real estate photos to the next level.
Adjust Brightness and Contrast
One of the most fundamental editing techniques is adjusting the brightness and contrast of your photos. Properly balanced brightness ensures that all details in the image are visible, while contrast helps to make the image pop. Use photo editing software like Adobe Lightroom or Photoshop to make these adjustments. Increase the brightness slightly to lighten up darker areas, and adjust the contrast to add depth and dimension to the image.
Correct White Balance
White balance adjustments ensure that the colors in your photos are accurate and true to life. Different lighting conditions can cause color casts, making images appear too warm (yellow/orange) or too cool (blue). Use the white balance tool in your editing software to correct these color casts. You can use preset options (such as daylight, tungsten, fluorescent) or manually adjust the temperature and tint sliders to achieve the desired look.

Enhance Colors
Vibrant and well-balanced colors can make your real estate photos more attractive. Use the saturation and vibrance tools to enhance colors without making them look unnatural. Saturation increases the intensity of all colors, while vibrance selectively boosts the intensity of less saturated colors, protecting skin tones and other critical areas from over-saturation. Adjust these settings to bring out the natural beauty of the property.
Sharpen Images
Sharpening your images enhances the details and gives them a crisp, professional look. Use the sharpening tool in your editing software to increase the clarity of your photos. Be careful not to over-sharpen, as this can introduce noise and artifacts. Adjust the sharpening amount, radius, and detail sliders to find the perfect balance that highlights important features without compromising image quality.
Correct Lens Distortion
Wide-angle lenses, commonly used in real estate photography, can cause lens distortion, making straight lines appear curved. Correcting this distortion is crucial for professional-looking images. Most photo editing software offers lens correction tools that automatically fix common distortions based on the lens used. Alternatively, you can manually adjust the distortion, vertical, and horizontal perspective sliders to achieve a more natural look.
Use HDR Techniques
High Dynamic Range (HDR) photography involves merging multiple exposures to capture a wide range of light and detail in a scene. This technique is particularly useful in real estate photography, where you often have bright windows and darker interiors. Use HDR software like Photomatix Pro or the HDR merge function in Lightroom to combine multiple exposures, ensuring that both highlights and shadows are well-exposed and detailed.
Remove Distractions
Distractions such as blemishes, wires, or unwanted objects can detract from the overall appeal of your photos. Use the spot removal or clone stamp tool to eliminate these distractions. Carefully retouch areas where imperfections are present, maintaining a natural look. Removing distractions helps to focus attention on the key features of the property.
Straighten and Crop
Ensure that your photos are properly aligned and framed. Use the straighten tool to correct any tilting or misalignment. Cropping your images can also improve composition and remove unwanted elements from the edges of the frame. Maintain the original aspect ratio to ensure consistency across your photos.
Apply Gradient Filters
Gradient filters can enhance specific areas of your photo, such as the sky or foreground. Use a gradient filter to darken an overly bright sky or to add warmth to a shadowed foreground. This technique helps to balance exposure across the image and adds depth and interest to your photos. Adjust the gradient filter’s exposure, contrast, and color balance settings to achieve the desired effect.
Final Touches: Noise Reduction and Vignetting
Finally, apply noise reduction to minimize any graininess, especially in low-light areas. Most editing software offers noise reduction tools that smooth out noise while preserving details. Additionally, adding a subtle vignette can draw attention to the center of the image, enhancing the overall composition. Adjust the vignette settings to darken or lighten the edges of your photo subtly.
Conclusion
Effective editing techniques can significantly enhance your real estate photos, making them more attractive to potential buyers. By adjusting brightness and contrast, correcting white balance, enhancing colors, sharpening images, and applying advanced techniques like HDR and gradient filters, you can create stunning property images that stand out in a competitive market. Investing time in editing will ensure your real estate photos look professional and appealing, ultimately helping to sell properties faster.

