Real estate photography requires precision and attention to detail to capture the best possible images of a property. Knowing the optimal camera settings can make a significant difference in the quality of your photos. Here’s a guide to the best camera settings for real estate photography, ensuring your images are sharp, well-lit, and professional.
ISO: Keep It Low
ISO controls the camera’s sensitivity to light. For real estate photography, it’s essential to keep the ISO as low as possible to minimize noise and graininess in the images. Ideally, set the ISO between 100 and 400. If you’re shooting in low light and need to increase the ISO, try not to go beyond 800 to maintain image quality.
Aperture: Achieve Depth of Field
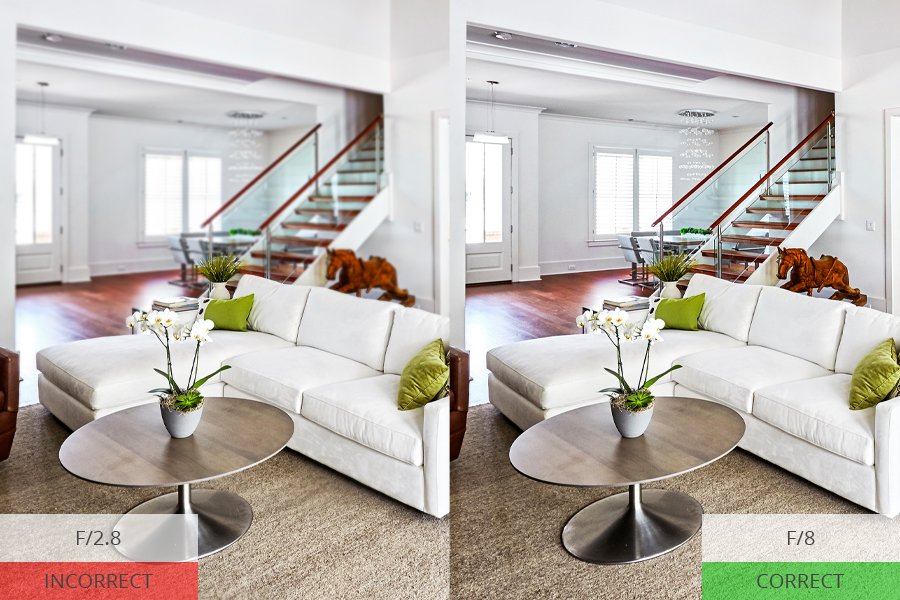
The aperture setting, measured in f-stops, controls the amount of light entering the camera and affects the depth of field. For real estate photography, a smaller aperture (higher f-stop number) is preferred to keep the entire scene in focus. An aperture setting between f/8 and f/11 is ideal, providing a good balance between depth of field and sharpness.

Shutter Speed: Keep It Steady
Shutter speed determines how long the camera’s sensor is exposed to light. For interior shots, a slower shutter speed may be necessary to allow enough light into the camera, especially in dimly lit rooms. Use a tripod to avoid camera shake when using slower shutter speeds. A shutter speed between 1/60 and 1/2 second is typically suitable for interior shots, depending on the available light.
White Balance: Ensure Accurate Colors
White balance settings ensure that the colors in your photos are accurate and true to life. Auto white balance can work well, but it’s often better to manually set the white balance based on the lighting conditions. Common presets include:
- Daylight for outdoor shots during the day.
- Tungsten for rooms with incandescent lighting.
- Fluorescent for rooms with fluorescent lighting.
- Custom white balance can be set using a grey card for precise control.
Focus: Use Manual or Autofocus
For real estate photography, sharp focus is crucial. While autofocus can be convenient, manual focus allows for greater control and precision, especially in tricky lighting conditions or when using a tripod. Ensure your focus point is set correctly to capture the most critical elements of the scene, such as a room’s main feature or architectural details.
File Format: Shoot in RAW
Shooting in RAW format provides the highest quality images and the most flexibility in post-processing. RAW files retain all the data captured by the camera’s sensor, allowing for greater adjustments to exposure, white balance, and other settings without degrading image quality. Although RAW files are larger and require more storage space, the benefits in editing make them the preferred choice for professional real estate photography.
Bracketing: Capture Multiple Exposures
Exposure bracketing involves taking multiple shots of the same scene at different exposure levels. This technique is particularly useful in real estate photography to ensure well-exposed images in various lighting conditions. You can later merge these exposures in post-processing to create a high dynamic range (HDR) image, capturing details in both shadows and highlights.
Additional Tips for Real Estate Photography
Use a Tripod
A tripod is an essential tool for real estate photography, especially when shooting interiors with slower shutter speeds. It ensures stability and prevents camera shake, resulting in sharp images. Additionally, a tripod allows you to compose your shots precisely and maintain consistent framing.
Utilize a Remote Shutter Release
Using a remote shutter release or the camera’s timer function can further reduce the risk of camera shake, particularly with long exposures. This tool is especially helpful when shooting HDR images, where multiple exposures need to be taken without any movement.
Post-Processing
Post-processing is a vital step in real estate photography. Use photo editing software like Adobe Lightroom or Photoshop to adjust exposure, white balance, contrast, and sharpness. Merging bracketed exposures to create HDR images can enhance the overall quality and appeal of your photos.
Conclusion
Mastering the best camera settings for real estate photography can significantly improve the quality of your images, making properties look their best and attracting potential buyers. By understanding and utilizing optimal settings for ISO, aperture, shutter speed, and white balance, and by incorporating techniques like bracketing and using a tripod, you can capture stunning real estate photos that stand out.

